
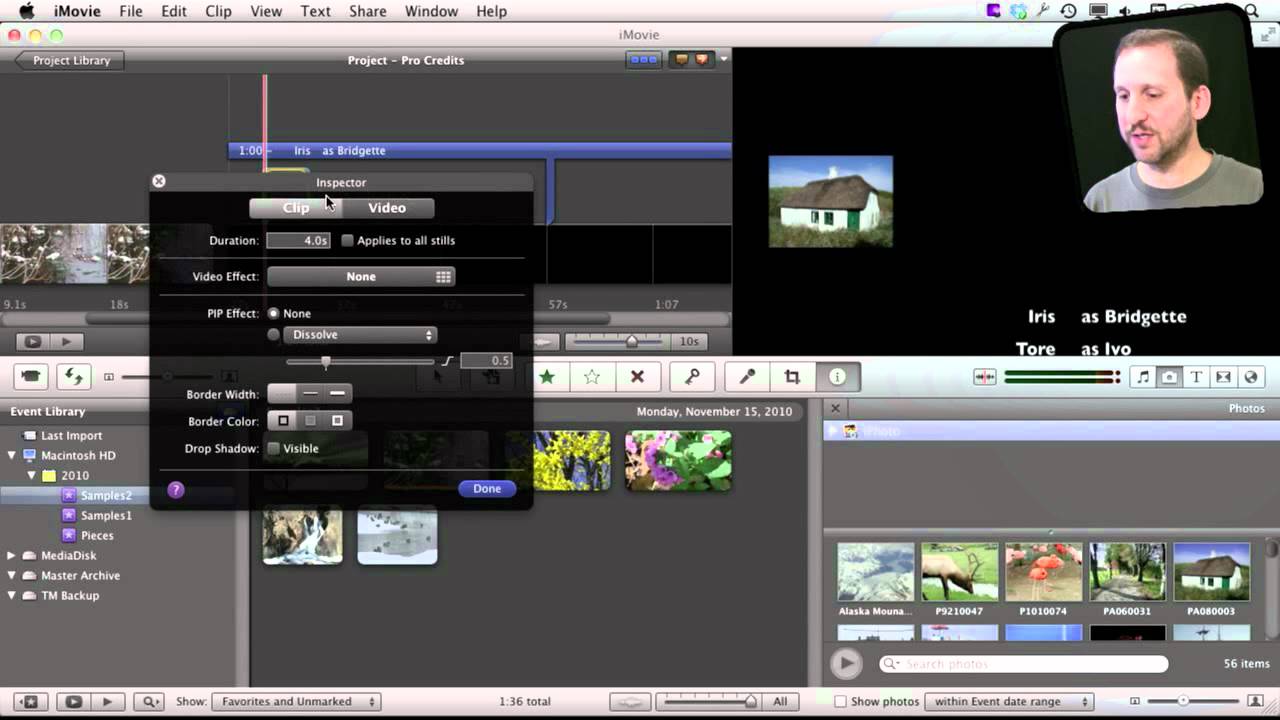
You can combine different elements of iMovie to create your own effects and titles. As an example, learn how to create scrolling end credits that include still images fading in and out on the left.
▶ You can also watch this video at YouTube.
▶
▶ Watch more videos about related subjects: iMovie (138 videos), Video (65 videos).
▶
▶ Watch more videos about related subjects: iMovie (138 videos), Video (65 videos).


Great tip Gary! This video is a must see for anyone that creates videos. Thanks for all your efforts.
Another great insight into making iMovie a really productive tool for creating better and better movies. Thanks, Gary.
That was COOL!!! Thanks, Gary. I will use that idea very soon.
Awesome video you should make a book about iMovies with tips and tricks! Will be great!
A great tip! This is something I wanted to do. Thank you.
Thanks Gary, I was hoping you would do this video. I did the video out-takes in my video I did in February. I did learn more from your video about adjusting the credits over to the right which will eliminate a lot of the steps I went through to get the same results.
This is great. Thanks much, Gary. Have a request if you do requests; could you please show how to render a movie which is full screen. I terribly dislike the black box that renders with the file. I like iMovie but am use to Adobe products. iMovie doesn't like MTS or M2T files unless imported straight from recording device to iMovie, well I didn't know that until I already transferred the files straight to the movies folder. Thanks and if you do have a tut already on this, I just haven't found it. MacMost is the best place to learn anything Apple.
Do you mean the black bars that appear on the sides or top and bottom so that a video can fit in the frame? That's mathematics. If you have a 4:3 video and want to fit it in a 16:9 video, or vice-versa, then you need either those black bars, or you need to crop your video.
See episode 579 where I explain this a little bit: http://macmost.com/cropping-photos-in-imovie-11.html
Gary. Thanks for this tip. Another gem from you. I make TONS of videos and movies and this is just perfect. I will try it tonight.
You should definitely publish an ebook on all these tricks for imovies.
I'm already using a lot the tutorial you did in how to fix a photo in preview to insert into an iMovie project. It works wonders with the kind of videos I make.
Thank you so much for this website and the tips you publish.
Damian
Gary:
Wow. I can't tell you how much your videos have helped me with my family's Christmas DVD. Thank you. Thank you. I do have one question that I can't seem to solve on my own though; I don't have themes set automatically, but I do have each of the pictures in my scrolling credits surrounded in a 'news' themed frame. Can you tell me how to turn this off in the credits?
Thanks!
Not sure what it is you are seeing if you don't have a theme set. Why not just insert another scrolling credits before or after that, then copy and paste the text into it, then delete the one you don't want.
Thank you very much for taking the time to respond, Gary. Maybe my question should be how to turn off a theme within the scrolling credits? The pictures that I have inserted into the credits (just like you did in your video) are 'wrapped' in a frame of sorts - that resembles a news theme. If you only allot one response per person, I understand.
I don't really know what it is you are seeing. If you don't have a theme for the project, then you shouldn't be seeing it in that one portion. Try my work-around. It is all I can suggest.
is there anyway to insert more than one picture in picture at the SAME TIME, with out exporting and re-importing the movie?
Well, you could create a special image in Photoshop that has two images in it and transparent areas in between, and then overlay the entire thing giving the same result.
Is there a limitation (either in pixels or characters) for a title?
I want to list about 500 line items (400 reunion guest names plus other credits) and, depending on the font size, the page simply goes blank after a certain number of line items. (Font Size 14 = maybe 250 lines; Font Size 36 = maybe 100 lines; Font Size 24 = maybe 150 lines). Even though I extended the duration to about 4 minutes, the text stops being displayed even though there's more of the frame left; it's simply black. When I edit the text, it's all there; it simply does not display during playback.
Thank you.
Not sure of a limit. But why not just use multiple segments. Have each segment end after X number of lines and then fade to another background image or some such. Get creative, etc.
Gary, just what I was looking for -how to make my own Hangover movie style end credits! This is exactly what I was looking to create. Great post!
Great job Gary! Thanks for laboring over imovies to find really creative tips to share with us. Big ups!!
Gary, I created scrolling credits with the picture in picture effect and the scrolling credits initially looked great, it now appears fuzzy and Jerky during playback. any idea how to fix? It is the ending sequence for my daughter's bat mitzvah montage next weekend. Hope you can help. Thanks.
What do you mean by "during playback?" Are you exporting and viewing the final product? Or, are you just previewing in iMovie. Remember that previewing is literally "previewing" -- it is not the final product and just something rendered quickly to help you work with your edits. It doesn't look perfect. Try exporting to see the difference.
Gary, I followed your video and added 2 photos with no problem but when I added the 3rd photo it shows the 2nd photo in the preview and when I play it doesn't show anything in the place of the 3rd photo. I started over and now it is doing it on the 2nd photo (showing the 1st photo). I have tried restarting with the same results. Any idea what could be causing the problem?
Is this just in the preview? Try exporting to see it. Preview is just "preview" -- it does the best it can to display things in real time. But it is not what the final product will really look like.
Love your work Gary. Thanks so much for sharing your knowledge.