

ClipTools is a status menu application that gives you access to a variety of simple clipboard utilities from the right side of the menu bar. Here is a video introduction to ClipTools and here are troubleshooting tips.
In addition to being able to access older clipboard contents, you can save clips, use powerful Smart Clips, paste the date or time in any format you wish, paste sample Lorem Ipsum text, type calculations and paste the result, or even calculate the result of a formula currently selected in text.
Current version: 1.5.2.
⚠️ Note: Make sure you add ClipTools to System Settings, Privacy & Security, Accessibility or it will not work!

A No-Nonsense Guide To How To Use ClipTools
ClipTools is a Menu Bar app that will appear on the right side of your Menu Bar as a little toolbox icon. Besides the Settings window, there is no other window and nothing will take up space in your Dock. Click the Menu Bar icon to access everything.
Many of the functions of ClipTools work at the position of the text cursor in a document or on selected text. So make sure you’ve got the text cursor where you want or have selected text in your document first. Then click the menu and choose the function.
Table Of Contents: Clips • Saved Clips • Repeat Paste • Paste Date, Paste Time • Lorem Ipsum • Smart Clips • Smart Files • Calculations • Number Stack • Selection Stats, Change Selection Case, Selection Actions • Clip Manager • MacMost Links • Settings • Options Menu • Keyboard Shortcuts • Frequently Asked Questions • Feedback & Support Questions • Developer Notes
Clips
The first section at the top of the ClipTools menu contains a recent history of things you have copied to your clipboard. The list continues in the submenu named More Clips. You can change how many total clips are stored, and how many appear before More Clips is needed, in the Settings.
To add an item to the list, just copy it as normal, usually with Edit, Copy or Command+C in apps you are using. Only plain text and rich text will be added to the list. Text that apps label as passwords won’t be added to the list.
To paste an item from the list, make sure you are actively entering text into an app and the text cursor is at the position you want. Then select the item in ClipTools menu.
▶ Modifiers: Use Control to copy instead of paste, Option to add the item to the Saved Clips list, Shift+Control to paste as plain text, and Shift+Option to remove an item from the list. You can also use Control+Option to perform a Paste and also Remove the clip from the list. Shift+Control+Option will toggle hiding the clip. Hidden clips still work like regular clips, but are shown as (Hidden) in the menu.
▶ Advanced: If you use Shift you can group paste. This will paste that clip and all clips above it at the same time. A separator is placed between each clip, set in the Settings. You can use \n for a new line or \t for a tab in this separator text. The items are used in reverse order from the menu. So if you copy this, that and other and then paste with the separator text -, you will get this-that-other.
Saved Clips
Once you save a clip, you’ll see a Saved Clips submenu appear with that clip. Saved clips will remain in the submenu until you remove them. You can paste a saved clip just like you can with regular clips.
▶ Modifiers: Use Control to copy instead of paste, Shift+Control to paste as plain text, and Shift+Option to remove an item from the list. Use Shift to move an item to the first position in the submenu. Shift+Control+Option will toggle hiding the clip. Hidden clips still work like regular clips, but are shown as (Hidden) in the menu.
Repeat Paste
Repeat Paste will paste the last item previous pasted using ClipTools. For instance, if you use Paste Calculation and then want the result pasted again immediately after, you can use Repeat Paste. Or use if you want the results of a complex Smart Clip pasted a second time, or you use Paste Time and now want to paste the exact same time again, without the seconds changing. Works with Group Paste, Change Selection Case, and Selection Actions too. You can set Repeat Paste as a Global Keyboard Shortcut in the Settings.
Paste Date, Paste Time
When you use Paste Date or Paste Time, the current time is pasted at the text cursor. The format for each of these is set in the Settings. The format matches Unicode date standards. You can use this document as a general reference.
The defaults are M/d/yy for date and yyyy-MM-dd HH:mm:ss for time. That results in values such as 9/19/2022 and 2022-09-19 09:00:00, respectively. Here are some more examples.
- yyyy-MM-dd → 2022-05-31
- M/d/yyyy → 5/31/2022
- EEEE, MMMM d, yyyy → Tuesday, May 31, 2022
- EEE, MMM d, yyyy → Mon, Oct 31, 2022
- h:mm a → 3:59 PM
- H:mm → 15:59
▶ Advanced: You can include |+ or |- and a number at the end to add or subtract seconds. So M/d/yy|+86400 will paste the date for 24 hours in the future.
▶ Modifiers: Use Control to copy instead of paste.
Lorem Ipsum
This will paste nonsense sample text of various lengths. The Classic Paragraph option uses the original Lorem Ipsum text but all other options will use random Lorem Ipsum text. Title will paste a short phrase with each word capitalized.
▶ Modifiers: Use Control to copy instead of paste.
Smart Clips
Smart clips are clips you create manually instead of being imported from copied text. They can also use some very powerful special functions embedded in the text. For example, if you have the smart clip The quick {clip:1} fox. and the first copied clip is currently blue, then using the smart clip will paste The quick blue fox.
Version 1.5: You can nest most functions. So the Smart Clip {sub:{clip:1}|this|that} will paste the first item in the clips list, but with the text “this” replaced with “that.” The Smart Clip {case:words|{action:number-words|{selection}}} will take the selected text, such as “123”, convert to number words like “one hundred twenty-three”, then capitalize each word, with the final result being: “One Hundred Twenty-Three”. The Smart Clip {case:words|{ask:Which name?}} will ask for a name, and then make sure each word in the name is capitalized before pasting it.
Smart Clip Special Functions List
{clip:N} will paste the copied clip that is at the position N indicated by the number.
{date:M/d/yy} will paste the current date and time using the same formatting as the Paste Date and Paste Time commands. You can also use |+ and |- like in those commands.
Version 1.5: {date} can be used in place of {date:date format} if you want to just use the same date format as you have set for Paste Date in ClipTools settings.
{ask:Which name?} will prompt you with the text Which name? to enter text that will appear in place of that function.
Version 1.5: If you use a second parameter it will be used as the default text, such as {ask:Which name?|Mark}.
{pick:this|that|other} will prompt you to choose between this, that or other and then that will appear in place of that function. This prompt will also let you type in any text in addition to choosing from the list.
Version 1.5: Use {pick-clip} to select from a list of all clips from the menu. Use {pick-clip:n} to select from a list of the last n clips}.
{random:this|that|other} will randomly choose between this, that or other and then that will appear in place of that function.
{selection} will use the text currently selected at that point in the Smart Clip. If no text is selected it will use the contents of the clipboard instead.
{replace:this|that} will replace each occurrence of “this” in the Smart Clip will be replace with “that.” This is done last, so the Smart Clip “{selection}{replace:this|that}” would take the current selection and replace “this” with “that.” You can use multiple replace functions. This is case-sensitive unless you use “i” as a third parameter like {replace:this|that|i}.
Version 1.5: You can also use {replace:from|to|that} to replace all text from the first parameter to the second parameter with the third parameter. You can also add i as a fourth parameter to this.
Version 1.5: {sub:} is like replace, but works only on the part of the text inside the function. Use {sub:thisText|whatText|withText} to replace whatText with withText in thisText. Or, you can use {sub:thisText|fromText|toText|withText} to replace all text from fromText to toText with withText in thisText. You can leave fromText blank to replace everything from the start of thisText, or toText blank to replace everything to the end of thisText. A last parameter of i can be used with any of these to make the matching case-insensitive.
Version 1.5: {lorem:} can be used to generate Lorem Ipsum text in a Smart Clip. Variations: {lorem:classic}, {lorem:title}, {lorem:sentence}, {lorem:paragraphs|n}, {lorem:words|n}, {lorem:sentences|n}, {lorem:lines|n}.
Version 1.5: {stack:} can be used to include number stacks in Smart Clips. Variations: {stack:count}, {stack:sum}, {stack:mean}, {stack:median}, {stack:mode}, {stack:max}, {stack:min}. You can also include the contents of the stack separated by commas, tabs or lines with: {stack:commas}, {stack:tabs}, {stack:lines}.
Version 1.5: {action:} can be used to change the contents of text just like the Selections Actions submenu of ClipTools. Variations: {action:number-words|text}, {action:remove-extra-spaces|text}, {action:strip-tags|text}, {action:straighten-quotes|text}, {action:url-encode|text}, {action:url-decode|text}, {action:convert-to-html-entities|text}, {action:convert-from-html-entities|text}, {action:sort-lines|text}.
Version 1.5: {case:} can be used to change the case of the contents of text just like the Change Selection Case submenu of ClipTools. Variations: {case:upper|text}, {case:lower|text}, {case:words|text}, {case:sentences|text}, {case:lines|text}, {case:headline|text}, {case:alternate|text}, {case:random|text}, {case:upsidedown|text}.
{calc} will perform calculations inside a Smart Clip. This is done after {selection} and {clip:} processing. So you can select a number in text and use a Smart Clip like “Double: {calc:2*{selection}}” or “Product: {calc:{clip:1}*{clip:2}}” for complex Smart Clips. You can also use {ask:}, {pick:} and {random:} functions inside of {calc:}. Example: {title:Boxes Needed}We need {calc:ceil({ask:Number of Items}/{ask:Number Per Box})} boxes.
{reuse} You can use {reuse:ask|1}, {reuse:pick|1} or {reuse:random|1} to repeat the value of an ask, pick or random function in the Smart Clip. So if you get the value of “Joe” from {ask:Name?} then “Joe” will also appear where you have {reuse:ask|1}. You can use other numbers for subsequent ask/pick/random functions. If you leave out a number, it assumes 1, so reuse:ask} is the same as {reuse:ask|1}.
Version 1.5: {web} This will open the default web browser and use the entire results of the Smart Clip to open a web page. If it is a proper page URL, like https://macmost.com or macmost.com or macmost.com/cliptools then that URL will be given to the browser to open that page. Otherwise, if the Smart Clip results are like “macmost” or “macmost cliptools” then a search will be performed instead. You can control the search engine choice using {web:x} where x is google, duckduckgo, bing, yahoo, ecosia or brave.
{title:Smart Clip Title} will use the text after the colon as the title you see in the ClipTools menu. Will not appear the result of the Smart Clip.
▶ Modifiers: Use Control to copy instead of paste, use Shift+Option to remove a smart clip, use Shift to move the Smart Clip to the first position in the submenu, use Option to edit a smart clip.
Smart Files
Smart Files are like Smart Clips except they are stored in small text files that you create and edit in a regular folder of your choosing. You can use all of the features of Smart Clips, but don’t need to if you just want them to be simple text. The Smart Files submenu includes a command to select the folder you are using to keep these text files. There is also another command to update the menu that you must use when you add or remove files from the folder.
Calculations
Using Paste Calculation… will bring up a dialog box where you can type an equation like 1+1, (6+7)*5 or pow(7,3). The result will then be pasted into the selected position in text you are editing.
Symbols: + – * / and also % for mod. A – can be placed before a number for negative values. You can use the functions: sqrt(x), floor(x), ceil(x), round(x), cos(x), acos(x), sin(x), asin(x), tan(x), atan(x), abs(x), pow(x,y), atan2(x,y), mod(x,y), max(x,y,…), min(x,y,…). The constant pi is recognized too. The decimal separator you have set in your System Settings will be used, either a period or a comma.
After each calculation, the result will be added to the Previous Calculations submenu. You can select one there to paste the result again. The number of items stored in this history will match the Maximum Total Clips in the Settings.
In Settings, you can set Paste Formula With Calculation. If checked, the pasted text would be 1+1=2 instead of just 2.
Using Calculate Selection the currently selected text will be used instead of prompting for input. The result will replace the selected text. So you can select (9+23)*(3+2) and the result 160 will replace it. The Paste Formula With Calculation preference will be used here too. The result will also be added to the Previous Calculations submenu.
In addition, if you use Calculate Selection with nothing selected, the contents of the clipboard will be calculated and pasted. So you can select a formula, copy it, move the text cursor elsewhere, and then Calculate Selection to place the results there.
▶ Modifiers: Use Control to copy instead of paste with either command or the Previous Calculations. Shift+Option can be used to remove an item from the history.
Number Stack
The number stack is a list of numerical values you can accumulate, recall, sort and perform actions on. You add a number to the stack by using Number Stack, Add Selection To Stack or Add To Stack… The first takes the number in the selection and adds it to the stack. It will also take several values from the selection if they are separated by spaces, commas or new lines. Add To Stack… will allow you to manually enter numbers to add to the stack.
Once you have at least one number in the stack, you’ll see more options appear under Number Stack. You can see a submenu that lists all the values and allows you to paste any one value, or all of the values together separated by commas, tabs or new lines. You’ll also see the count, sum, mean, median and mode for the stack and you can select one of those items to paste that value.
You can use Sort Stack to sort the stack in numerical order. Hold the Option key down to do a reverse sort.
Alter Stack… will let you enter a mathematical formula with the character x representing the numbers in the stack. Then each number in the stack will change to show the result. Examples are x+1 will add 1 to each number in the stack, x*2 will multiply each number in the stack by 2, (x+1)/2 will add one to each number and then divide that result by 2.
Selection Stats, Change Selection Case, Selection Actions
Select some text and use Selection Stats to get the number of characters, words and lines in a selection.
In Change Selection Case you can force the text to all upper case characters, all lower case characters, capitalize each word, capitalize each sentence, capitalize each line, use upper and lower case on alternate characters, or use upper and lower case randomly for each character. Upside Down will change letter characters to symbols that simulate the text being shown upside down, and also reverse the order of the characters.
The special Headline Case action will capitalize most words, except for words listed in ClipTools Settings. You can specify there that words such as the, and, a and of are lowercase, except when at the start of the selected text. You can also specify special cases like iMac, iPhone or macOS in that list. Customize the list in setting to fit the style guide you follow. Note that often words are capitalized or not depending on their use in the text. This feature does not handle those, but hopefully it will give you a place to start from even when you need to make some changes afterward.
Convert To Number Words will take a number like 1234 and convert it to words like “one thousand two hundred thirty-four.” Hold the Option key to also capitalize the result. If you use a value like 1234.56 the result will be “one thousand two hundred thirty-four and 56/100,” similar to the format used by many to write checks.
Remove Extra Spaces will look for places where more than one space character appears together, and convert those to a single space. Strip Tags will take HTML and XML code like <b>Hello!</b> and remove the tags. Straighten Quotes will take curly quotes like “” ‘’ and convert them to straight quotes like “” ”. URL Encode will take text like “this & that” and convert it to “this%20%26%20that” as you may find in web URLs. URL Decode will do the opposite. Convert To HTML Entities will take “this & that” and convert it to “this & that.” Convert From HTML Entities will do the opposite. Sort Lines will take a selection and sort it alphabetically by line. It will also handle numbers properly, to give the order 1, 3, 21 instead of 1, 21, 3.
Clip Manager
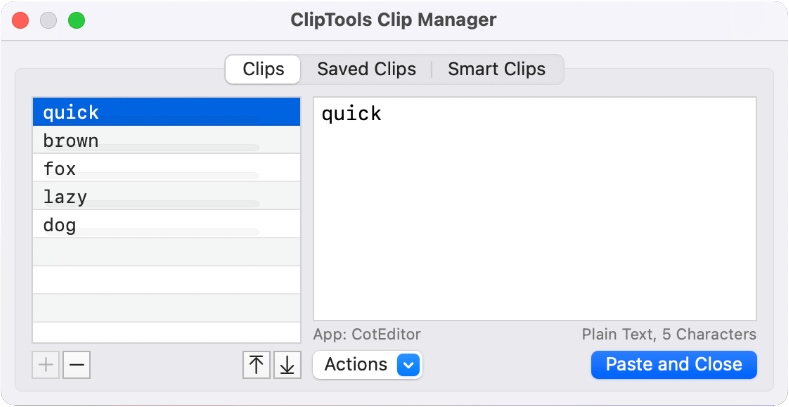
This window allows you to view, arrange, edit and use your clips. At the top select Clips, Saved or Smart Clips. Then on the left select the clip you wish to view. You can use the list on the left to drag and drop to reorder clips. You can use the arrow buttons at the bottom of the list to quickly move the selected clip to the top or bottom of the list. You can use the – button to delete the selected clip. The + button will create a new clip with some placeholder text in Saved Clips and Smart Clips.
When a clip is selected, you’ll see it on the right. Under the clip will be some information like the app the clip came from, the type of clip (plain text, rich text or multiple types), and the number of characters. If a clip is plain text or rich text you can edit the clip. Styles of a selection in rich text clips can be edited using the Control+click context menu.
The Actions menu button at the bottom of the window lets you perform different actions depending on the clip type. You can convert rich text clips to plain text, for instance. If you want to end a clip that is “multiple types” just convert it to plain text or rich text using one of the Actions. Use the Hide/Unhide action to hide a clip so it still works, but the contents are not shown in the Menu Bar or Clip Manager. You can also copy a clip to under Clips to Saved, or copy a clip to Smart Clips.
The Paste and Close button at the bottom right lets you paste the clip into the current app just like you were selecting the menu item for that clip. The window automatically closes when you use this so you can bring up the Clip Manager, select a clip, and click the button to paste it. You can also choose Copy and Paste from the Actions menu to copy or paste a clip without closing the window. Using this with a Smart Clip will work like selecting it from the menu, so ask and pick functions will prompt you, etc.
Smart Clips have a Set Shortcut button where you can assign a global hotkey to a Smart Clip. Click the button and then press a keyboard combination like Command+Control+Option+V or Command+F7. Then you can use that Smart Clip with a single keyboard shortcut without needing to use the Menu Bar at all. Remember that Smart Clips don’t need to include special functions. They can just be some plain text. So use Smart Clips for your more important saved clips and trigger them easily.
Version 1.5: Use the search button (magnifying glass) or Command+F when in the Clip Manager and then type in the search field that appears. Once you type something, only the clips with that phrase will appear. So if you type “row” then “The quick brown fox…” will be listed. You can also use “app:x” where x is the name of an app like “app:TextEdit” to see the clips from a specific app. But you can’t combine these, or look for non-consecutive words, or use boolean operators or anything like that.
Tips: Hold the Command key down and click the Paste and Close button and the window will remain open. You can also use the Enter key on the numeric keypad or FN+Return on a compact keyboard to trigger the Paste and Close button. If you select the ClipTools menu, go to Clip Manager, and hold down Option key just before selecting it, you’ll get a floating window that will stay on top. You can use Command+W in the Clip Manager to close it. Command+1, Command+2 and Command+3 will jump to each section of the Clip Manager and arrow keys can be used to select a clip, then Enter to paste it. If you assigned a global keyboard shortcut in the Settings to Clip Manager you can use that keyboard shortcut to bring the Clip Manager to the front if it is behind another window, or close it if it is in front.
MacMost Links
This section contains links to the MacMost.com homepage, the free weekly newsletter signup page, a submenu that lists the last 5 video tutorials posted at MacMost, and a link to the Patreon information page where you can support the app.
Settings
Maximum Total Clips: How many regular clips to store in the main menu and More Clips submenu total. When you exceed this number, the oldest clip will be removed when you add a new one.
Clips Shown In Main Menu: How many regular clips will appear at the top of the main menu. If this is set to 3, and the Maximum Total Clips is 10, then 3 clips will appear in the main menu, and 7 clips in the More Clips submenu.
Clear Clipboard Manager Data: These buttons will clear the regular clips and Saved Clips. Buttons to clear previous calculations and Smart Clips.
Group Paste Separator: When you perform a group paste, this text will be inserted in-between each clip. Use \n for a new line and \t for tab. You can put anything else here, including multiple new lines and tabs.
Ignore Clips From Apps: List apps by name with commas as a separator. When you are using this app and copy text, ClipTools will not add this text to the clips list.
Hide Clips From Apps: List apps by name with commas as a separator. When you are using these apps and copy text, ClipTools will add the text to the clips list as normal, but they will be shown as (Hidden) in the menu. You can still use these (Hidden) items as normal, this just hides their contents when you view the ClipTools Menu. You can hold Shift+Control+Option to unhide any hidden clip in the menu.
Paste Date Format: The format to be used for the Paste Date function. The format matches Unicode date standards. You can use this document as a general reference.
Paste Time Format: The same as Paste Date Format but for the Paste Time function. There is no real difference between these two functions except the name and default format.
Paste Formula With Calculation: If checked, then when you use Paste Calculation… or Calculate Selection the original selected text will be included, followed by an = character and the result. So if you type 1+1 the result will be 2 if unchecked, and 1+1=2 if checked.
Headline Case Exception Words: A comma-delimited list. Do not uses spaces. When using the Headline Case action, any words in this list will be treated as special cases. A word in this list that is all lower case will not be capitalized unless it is at the beginning. A word that is mixed case, like iMac, will always appear with exactly that case even if at the beginning. Customize this list to fit your style guide for headlines. Note that some style guides specify some words be capitalized or not depending on the grammatical context. The Headline Case action does not take this into account, but you could use Headline Case to start, and then manually change any words afterwards.
Global Keyboard Shortcuts: Click the first button to go into a mode where you can then type a keyboard shortcut. Be sure to use something not in use by other apps or the system. Suggestions are Command+Shift+C, Command+Shift+M or Command+\.
Use the Clear button to remove that shortcut. Then select the action to be performed by the shortcut. If you choose Activate Menu, then ClipTools menu will open and you can use the arrow keys and Return to select any function without needing to use the mouse or trackpad. Otherwise, if you choose a specific function it will trigger that function without opening the menu at all.
Launch At Login: Check this if you wish to have ClipTools automatically start up when you log in or restart.
OK/Cancel: Note that you must use the OK button for the changes to go into effect. If you use Cancel, then all settings will revert to the same values as when you opened the Settings window.
Options Menu
Hold down the Option key before selecting the ClipTools menu. Instead of the usual functions, you’ll see a set of Clear functions. These will quickly and instantly clear ALL clips in the category you select. Note, this only happens if you hold the Option key down while you select the menu. Using Option with the menu already active won’t trigger this special menu.
Version 1.5: Hold down the Option key and then select the Clip Tools Menu. Choose Snooze Clip Capture and then a time. The clipboard will no longer be added to the ClipTools clip history until the time expires. You will then see a non-active Clip Capture Snoozed item in the Options menu instead. You’ll also be able to select End Snooze there to resume clip capture early.
Using Keyboard Shortcuts
The keyboard shortcuts shown in the menu, such as Shift+Command+D for Paste Date and Command+Comma for Settings, only work when the menu is selected. ClipTools is a “status menu app” and this is how status menu apps work in macOS by design as regular keyboard shortcuts for the menu bar only work when the app is the current app, and ClipTools is only the current app when the menu is active.
To make ClipTools more useful from the keyboard, there are two Global Keyboard Shortcuts (Hot Keys) you can set in ClipTools Settings. These special shortcuts can be used even when ClipTools is not the current app. You can set one to Activate Menu which will open the ClipTools menu. Then you can use the shortcuts like Command+1, Shift+Command+D and so on.
So if you set the first Global Keyboard Shortcut to Shift+Command+C and set it to Activate Menu, then you can use: Shift+Command+C followed immediately by Shift+Command+D to paste the date.
There is also a second Global Keyboard Shortcut that you can assign directly to a command to perform it in one step. So if you find you often use Calculate Selection, you can set the second Global Keyboard Shortcut to Shift+Command+= and its action to Calculate Selection and then perform that command with a single keyboard shortcut.
Want more global keyboard shortcuts? Remember that Smart Clips can be assigned keyboard shortcuts in the Clip Manager. You can use Smarty Clips for regular text, or add Smart Clips functions to mimic things done with other ClipTools commands. For instance, if you use {case:lower|{selection}} as a Smart Clip and assign a keyboard shortcut to that in the Clip Manager, you can now have a global keyboard shortcut to take the current text selection and make it all lowercase. Or use {case:lower|{pick-clip}} as a Smart Clip and assign a keyboard shortcut and you now have a way to trigger a prompt that will let you select a recent clip and paste it all in lower case.
Frequently Asked Questions
Check out this three-minute troubleshooting video that addresses some of the most common problems people have when getting started with ClipTools.
Pasting from ClipTools doesn’t work. How do I fix? You need to add ClipTools to the list at System Settings, Privacy & Security, Accessibility. Drag ClipTools from your Applications folder into this list, then confirm that the switch is on next to it. Before version 1.1.1 ClipTools would prompt for this and explain what needed to be done, but apparently this sort of prompt isn’t allowed by Apple any longer for apps like this.
Is ClipTools really completely free? Yes. It is free to download from the Mac App Store and there are no in-app purchases or anything. If you find value in using ClipTools, please consider joining many others by supporting MacMost at https://macmost.com/patreon.
After installing ClipTools, how do I get it to appear in the Menu Bar? First, remember to launch the app after installing. You can do this using LaunchPad. If the ClipTools icon still doesn’t appear on the right side of the menu bar, check to make sure the right side of your Menu Bar isn’t already full.
When I try to use ClipTools to paste something, it says I need to grant permissions and takes me into System Settings. But I don’t see ClipTools listed. How do I add it? ClipTools should automatically appear in the list, but if it doesn’t, you can go to System Preferences, Privacy & Security, Accessibility, and then click the + button, then locate ClipTools in your Applications folder and add it.
Does ClipTools handle images? No, ClipTools only handles text and rich text. As dealing with images would be a whole new interface where you could view and choose images, plus a database for storing those images, I think ClipTools will just stick with text and text-based tools.
Can you sync clips from one Mac to another using iCloud? Not currently. I may add this in the future.
Will there be an iOS or iPadOS version of ClipTools? No. Because apps on those devices are sandboxed and there is no Menu Bar the best an iPhone or iPad app could do is to provide access to your clips if I also added iCloud storage for the Mac app. So I don’t think it would be worth it. You can already copy something on your Mac and then paste on the iPhone or iPad through the operating system.
Feedback & Support Questions
Before sending a message, please check out this three-minute troubleshooting video that answers some of the most common questions. If you need to contact MacMost about the ClipTools app, you can do so using this form.
Developer Notes
ClipTools uses the follow open source frameworks: Expression, HotKey, and LaunchAtLogin. The ClipTools privacy policy page is here.

