
Sometimes the Finder can fail you when you want to copy lots of files, like an entire CD or DVD. Learn how to use the Terminal to copy whole volumes with better error handling and reporting.
You can also watch this video at YouTube.
Watch more videos about related subjects: Finder (317 videos), Terminal (43 videos).
You can also watch this video at YouTube.
Watch more videos about related subjects: Finder (317 videos), Terminal (43 videos).
Video Transcript
Hi, this is Gary with MacMost Now.
On today's episode, let's take a look at how you can use the terminal to copy files when the finder fails you.
So recently I got in a situation where I needed to copy the data from all these data DVDs back to a hard drive. I would drag and drop, holding the option key, the DVD to the hard drive, and it commence copying all of the data on the DVD to the hard drive. But then it would hit a file that it had a problem with. Sometimes this was a package file, an older type of install file for Mac OS X. Other times it was very different types of files, and it would come up with an error and simply stop copying. It would stop copying in the middle of a sub-folder of a sub-folder of a folder and I would end up with half of the data over on my drive and I'd have to figure out what wasn't copied and manually copy each individual folder afterwards. It was very complex. And I really just wanted it to skip these files that it couldn't copy, and copy everything that it could.
Well, it turns out the finder just couldn't really do it. But the terminal could do it easily. Let me show you how.
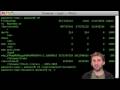
So, you can find terminal in your applications folder. When you run it you get a screen kind of like this, although the default is for a white background with black text. I'm going to go ahead and type "df" which will list all the different devices and drives attached. And the key to this is finding out the actual real name as the terminal will see it. And here I can find the DVD that I've inserted, which is iPhoto Library - 2003-2005. Here's the name. It's /Volume/iPhoto Library. I'm just going to select it and copy it so I can paste it into a command exactly as it appears here.
Now the next thing you want to do is you want to go to the place where you're going to copy the files to. So, for instance, I'm going to go into my documents folder. So, that would be in "users" and my user name, "documents". And there I am.
Now to copy, we use the cp command. But the cp command, by itself, will only copy a file. If you have a folder, it won't look inside the folder. Matter of fact, it'll complain to you about the folders. So what you want to do is you want to tell it you want to copy folders and folders inside of folders and files inside of that, etc. You want to do that with -r. r for recursive. In other words, look inside of everything and keep looking deeper and deeper, and it'll copy everything starting with the directory you're going to specify. The next thing you want to do is you want to tell it to retain all the properties of the files so you want to put a "p" there too, so we have "r" and "p". Now the next one's optional. You can do "v" for verbose. That'll basically give you output of every single file it's copying, so you can see what's happening. If you leave that off, it'll just be quiet unless it encounters an error.
Now we want to put the name of the place we're copying from. Now we've copied before from the df command, the exact file of the volume we want. So we're just going to put a " and paste it in there. The reason we need a quote is because there's spaces in the name, as there typically are in Mac files and folders and DVDs and CDs, etc. If you put a space in a command line in the terminal, it will take this as a separation of parts of the command. You don't want that. You want to tell it that this is a full name of that volume. So, you want to put a ", paste in that volume name, which includes the spaces that you see, and then close the quote, like that. Now, if we hit return, it will copy this entire volume to the location that we're at.
Now we're not done quite yet. We need to show it where to copy to. Now since we've already navigated to the directory we're copying to, we can simply tell it we want it in the current location. We can do that with a dot slash (./), basically saying the same directory. Now when I hit return, we'll start to see all the items copied in this new location.
While it's doing that, I can actually go ahead and look in the finder in my documents, and I can see that there's a folder with the name of that directory, and it's copying stuff into it. There's the iPhoto Library, since it's an iPhoto disk, and look, you can see it adding folders right there as we watch.
Now if you ever make a mistake, or notice it's copying the wrong thing, you can always hit CONTROL and C (not COMMAND and C), to break running a program in terminal like that. And while you're in there, you can also look up more information about the cp command. The way to do that is to type "man" for manual, and "cp", and it will give you all sorts of information and other options, in case you're interested.
So again, the advantages of this is that it won't fail if there's just one file there that it can't copy. It'll just give you an error message and keep going. Matter of fact, if you leave out the v for verbose, you'll see nothing happening unless it runs into an error. So it's a great way if you're having trouble, to see exactly which files it didn't copy and perhaps you can try to do something with those afterwards. That's a quick look at using cp in terminal to copy files when the finder fails you. Until next time, this is Gary Rosenzweig with MacMost Now.
Thanks for the tip!
To place volumes/folders/files names; Instead of typing it in the terminal, you can open a Finder window, then locate the desired source (or destination), then simply drag-and-drop the object inside the Terminal window. The complete path will be entered automatically by Unix at the cursor position.
Man, you really made my day! I was stuck with my whole itunes library, and no possibility to copy it back to a newly formatted FAT32 external drive. I wish I had found your post earlier. Would have saved me some precious time. You're first in my bookmarks now!
Thanks. I had exactly the same problem with the stupid Finder.
You da man!
You helped me recover over 90 gigs from my external hard drive thank you so much
I need to know how to do this :(
Good God. Finally a clear answer! Where has this video been hiding all my life?
Thank you! 65GBs of music was painstaking! More people should know about you.
This works:
cp -rpv "/Volumes/Untitled" ./
But this does not work:
cp -rpv "/Volumes/Untitled/Documents\ and\ Settings/Grim/My\ Documents " ./
Note: The path were obtained by dragging the folder into terminal so I know I don't have a type. Any help would be appreciated.
Thanks
The forward slashes \ are used to tell the terminal there is a space in the name. Putting the whole path in quotes tells the terminal that the \ are really in the file name, which they are not. So either get rid of the quotes or the forward slashes and it should work just fine.
That's a backslash.
Thank you so much for this tutorial! You really made my day!
I used your command to copy the entire HDD from my girlfriends MacBook to an external HDD.
Best regards,
Pieter
I have this running right now in my terminal! Thank you SO much for this quick and easy tutorial! This is JUST what I was hoping to find!!
I've been hunting for a mac app to do a better job of copying files, and now I don't need one, and I can feel cool using Terminal!
I use it this way to prevent a file from being overwritten at the destination:
cp -rpn /Volumes/HardDrive/PHOTOS/2010 ./
also, I learned if you end the directory with a slash, it will only copy the contents, not the actual directory. such as:
/Volumes/HardDrive/PHOTOS/2010/
Well... You got me closer than finder, however, Resource busy messages keep popping up and halting the whole procedure. So much for Terminal bypassing troublesome files.
what is the last button i shoul'd hit???
What do you mean? Can you be more specific?
you are greAAAAAAT MAN thanks a lot
Hi I tried typing this in cp -rpv "Final cut tutorials" ~/Volumes/"External 1TB" it found the files however said no such file or directory after each one. What did I do wrong? I was moving a folder from my desktop to an external hard drive.
That doesn't look right. Why the ~ before the destination? What happens when you just use the Finder to do the copy?
Great tip- I was having issues copying a large music collection from one external hd (fat32) to another. Your tip and great tutorial worked like a charm. Thank you again for the post!
Great tutorial, though I have had a problem. I am trying to copy "Documents" to my external hard drive.
I use:
cp -rpv "Volumes/The Hard Drive/Users/myname/Documents" ./
All my output comes out with "./Documents/*filename*: No such file or directory"
Then the final line says: "Volumes/The Hard Drive/Users/myname/Documents: unable to copy ACL to ./Documents: Read only file system"
When I check the contents of the external, nothing has happened
Works like a charm where neither Disk Utility or Disk Warrior could be of any use. Started up with install disk and launched Terminal, followed your instructions and Voilá! Copied all my data to a external usb drive after HD failure (invalid node structure). Couldn´t even mount the corrupted HD in target mode. Reinstalled system and activated Time Machine in case of further problems with the drive.
Merci beaucoup!
The North Front
Thanks Gary.
Hi there all,
My Hard Disk crashed (OSX Lion) (invalid node & I/O error) and could be repaired even using DWarrior, and this video solution helped me but it only worked with me this way:
1- booted my mac while pressing on the alt key
2- choose HD recovery
3- opened terminal
4- used the command given in this video and worked like a charm
a good read that helped me too is ----://aleman.lsnepal.com/2011/10/using-terminal-to-transfer-files-from.html
hope this helps you all
Gary, your the man as I recovered all my data thanx to you
if i want to copy all the files from a cd to a usb?
Just drag and drop in the Finder. No need to use Terminal for that.