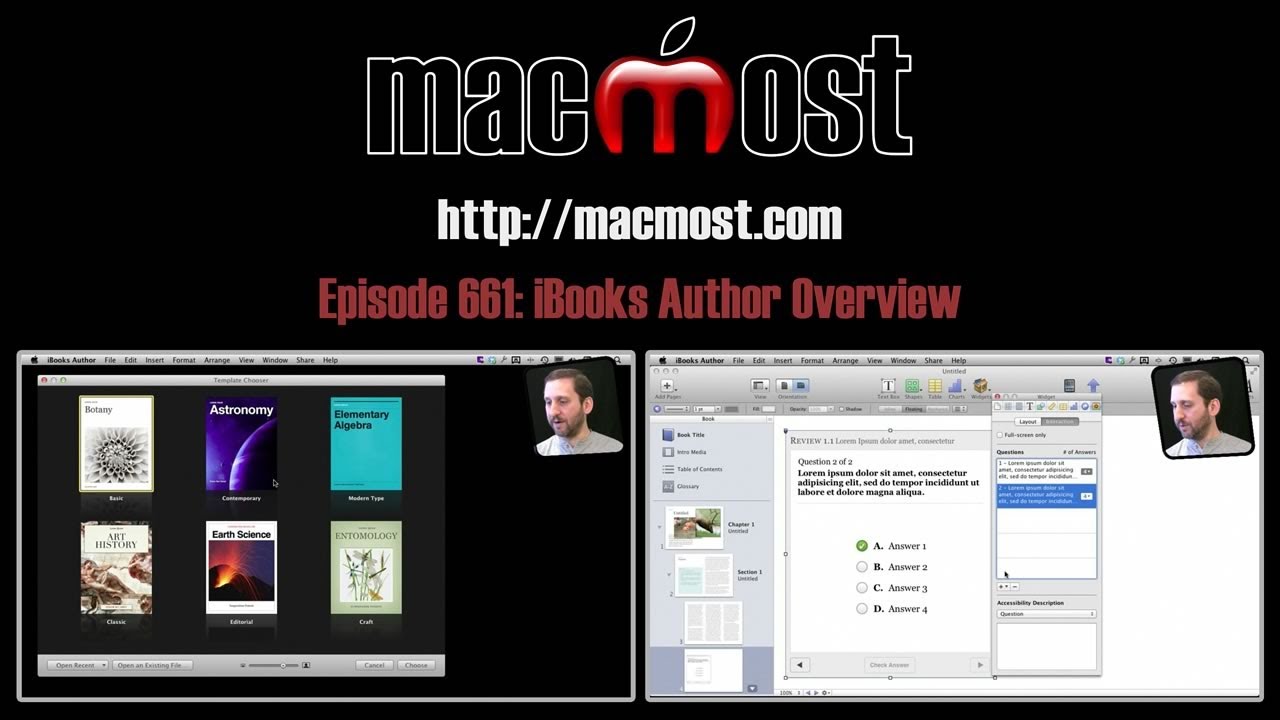
Take a quick look at iBooks Author, the new tool from Apple that lets you create textbooks for the iPad. You can design and layout pages like in iWork Pages. You can also add special elements like photo galleries, quizzes, 3D objects and interactive images.
You can also watch this video at YouTube.
Watch more videos about related subjects: Apple Books (8 videos), iPad (180 videos), iWork (42 videos).
You can also watch this video at YouTube.
Watch more videos about related subjects: Apple Books (8 videos), iPad (180 videos), iWork (42 videos).
Video Transcript
Hi, this is Gary with MacMost Now. On today's episode, let's take a quick look at iBooks Author. So iBooks Author is the new free tool from Apple that allows you to create textbooks that can then be read using the iBooks app on the iPad. Let's go and take a look at how it works. So when you run iBooks Author, it starts you off by choosing a template. And you've got a bunch of basic templates here. The first one called Basic and the others are slight variations on that. So you can explore those, but for now let's choose the basic template and create a new document with it. So if you're familiar with Pages, you should recognize all this stuff. You've got your pages here on the left, and you can easily add new ones, like that. And they come from different templates here, so you can add, say, a new page of different columns or a blank page to start with. You can also add elements like text boxes, shapes, tables, and charts, just like in Pages. So you always start off with some blank pages here. You've got the first page of a chapter, and the first page of the first section there, and then the first plain text page. You can change the template that is used for any of these. So I can change this to a three-column layout. And you can add a page, as well, of any type. So let's add like a blank one here. And you can switch between them pretty easily, clicking there. You have all the different elements inside of a page, so for instance, here I've got this element here. I can select it. I can go to the inspector, here. Let me bring that out. And I can say, just like in Pages, adjust the text by using the inspector. So, let's center it for instance. I can select say this image here and I can adjust its frame. And you can do all the basic things you could do in Pages. This is all pretty much the same how you edit a document. A lot happens by drag and drop. So, for instance, if I were to bring up the Media inspector here, which should be familiar to you from other applications, I can drag and drop a different photo into this spot, here. And then I can zoom in on it and edit it, just as before. And then you can drag in other photos, too, and just add them to the document, like that. And then adjust and even change the wrapping, as you could from before, like for instance, having it not cause the wrap. And you can arrange it in, say, send it to back, underneath the text, like that. So there's a lot you can do. It's basically the same as other iWork applications. Now you have all these special widgets that you can create. So widgets, like for instance the Gallery widget here, I'll just add a gallery, and I can bring up the Media inspector, drag a bunch of photos into to. So let me just drag three photos in here and close that. And now I can see that I've got three dots here at the bottom, representing the three photos and the inspector here, I can flip between them. I can add one using these buttons here as well. Or I can change the layout in various ways, get rid of different things. So all sorts of different stuff that you can do to create a gallery. You can also have it show thumbnails here at the bottom, so you could easily flip between them. Another type of widget is the Review widget, which allows you to set up a little quiz. So you can change the question, change answers, add new questions here, so you can have question one of one, question two of two. You can add different types of things, for instance a multiple choice that has to do with several images. Or you could have even say a drag and drop type of quiz. So this allows you to basically set a picture here and then set multiple targets in a picture. And then you have your answers there and you have to drag and drop them into place. Lots of other types of widgets, for instance you can add just a video there. You can drag an entire Keynote presentation in. An interactive image is kind of interesting, because you could basically drag in a picture. And after you drag in the picture, you can then set different spots on it, so for instance here's the default view and you might have some labels there. And then you can go to this first view and this first view gets closer on this spot here and you can change the text that appears there. The second one gets closer to this spot and you can change the text there. So you can basically take a tour of what's in an image or map or diagram or anything using this widget. Of course another widget that's going to be popular is the 3D widget here and if you have a 3D model that's the correct format...I've got a sample one right here. You can just drag and drop it in and then you could say set it to free rotate or auto-rotate. Lots of different things you could do here with the model and change its layout, just you can with other widgets. And then the last widget is a HTML widget, which is basically the same type of thing that you would use on the dashboards. You have to be a programmer to be able to create these special dashboard widgets to go in there. But they do allow for more interactivity, calling out to the web for more data, things like that. So it takes a programmer to be able to create one of these, but in the future we may see some that are available that you can add to your textbooks. Now, while you're creating your textbook, you can preview this. All those interactive elements and everything, you can preview on your iPad. All you need to do is hook up your iPad, run iBooks, and of course you have to have the new iBooks 2. And then you can go to Preview and it will actually create a quick version of the book and instantly open it up there on your iPad. You can flip through it. You can also preview only the current selection, just the thing that you're working on, which will be handy when you the book gets to be pretty large. Another important feature is the glossary. You can quickly create a glossary here by going through your text. You have to have your real text, not the sample text. And then you can select any term that you want. So for instance, I've got the term iPhone right here. Now let's go to View and bring up the Glossary Toolbar, which makes it very easy. It shows you what you have highlighted here and then you can click Add term and it adds it to the glossary. Now when I click on the Glossary here on the left, you can see that there's the term and I can then type in my own definition for it. I can then have that linked from that specific instance of the term or every one in the book, so it's very handy. And in addition to that, you also, of course, have a Table of Contents, which you build automatically based on the chapter and sections that you create. And also Intro Media. You can actually put a video at the beginning of your book. And then people will get kind of get this introduction. It could be something like a message from the author, it could be something professionally produced, whatever, to bring them into the book. When you're done with the book, you would go to either Share or Export, and you can create the iBook's format. Now the iBook's format you can freely distribute yourself to say your students if you're a teacher. You can also create a PDF, so a lot of interactive elements won't of course work. But you can distribute it in other ways. People can read it on their own computers, for instance. Another thing that you could do is, then also to submit it to the iBookstore. So you click on this link and you have to set up an account and everything with Apple, like you would if you were an app developer. And then you could publish your books to the iBookstore and actually charge for them. So there's a quick overview of iBooks Author. Of course remember, it is for textbooks. So it's tempting to go and try and use this for all sorts of other things, but in fact Pages handles most other things, like creating regular books, creating brochures, all sorts of different layouts and designs, just fine. This is really geared toward school textbooks, whether it's at the elementary, high school, or college level. So give it a try. It is free to download on the Mac App Store. Just search for it there and play around with it. Til next time, this is Gary with MacMost Now."
Great overview. Thanks.
Want to get the most out of my iMac and appreciate your way of making understanding different aspects so much easier for this grand mother. I have been using my Mac to create all kinds of memories for my children and grandchilren with iPhotos and iMovies.
Now I am wondering about continuing to use iBooks Author for doing a personal book of memories, using my page documents and photos.
I have for this past week been transferring the beginning of many page documents in my personal journal of 40 some years, along with photos inserted to document as the years go by, to iBook Author and have a good start going there.
Thank you for the extra hints in your overview of iAuthor yesterday, however I am wondering if I will have the available memory to continue and complete this large endeavor. I am thinking of publishing it as a PDF for family only, rather then printing out the many pages that would be required. It would also be a very heavy book.
Even though some of my grandchildren have iPods and iPhones, I am the only one to have an iPad at this time so that is why I am considering the PDF route.
Sorry for being so wordy but would appreciate any suggestions that you can offer.
Sounds like a wonderful project!
The only suggestion I would have is to think about using Pages instead of iBooks Author. iBA is really meant for textbooks. The special features it has that Pages does not are things like the glossary, quizzes, 3D objects, etc. Things that you would not be using because of the nature of your project -- and because they wouldn't export to PDF anyway.
I think Pages would better suit any project that was going to result in just a PDF. I would only use iBooks Author for projects that either were meant for iBooks on the iPad, or to be sold in the iBookstore.
But that is just a suggestion. I can't think of a reason why you need to switch at this point if you have already begun.
Thank you Gary. I did do a short trial with pages but found that it was easier for me, to work with inserting and captioning the photos anong the words, so have opted to stay with iBA.
What export setting should people use to add a video to iBook Author?
For example, should we export to a mobile size video from iMovie to our desktop and drag and drop it in?
Thanks in advance!
Try different ones to see what you like. I'd imagine that "mobile" is too small. I would try something larger.
I am writing a book in pages, how do you transfer to iBook author? Thanks for your help.
Should I be doing this is the proper way to do it?
It depends. Pages is a much more versatile tool. iBooks Author is really just for textbooks. Pages is for all sorts of things. Unless I was writing a textbook specifically, I would use Pages.
Nice video, very helpful! I am using iba to create a textbook and though I have some familiarity with Pages I've usually just used blank pages rather than templates. Is there a way in iba to insert a new page between existing pages? What does you do, if you get half way through your book and realize you need to add some material to a previous chapter? Thanks for your help!
There are many ways to insert pages. In fact, there is a whole Insert menu at the top in the menubar. You can also control+click and select Insert Page.
Yes, but I haven't found a way to insert anywhere except at the end of my document. I've tried to insert a page between pages 4 and 5 for instance but it always appears at the end. I know that pages can't be dragged in the book pane. You are supposed to be able to drag sections but I just tried creating a section page, a preface, and was unable to drag it to the front of the book. I probably haven't set my book up properly and am having problems as a result.
Thanks.
When I control+clicked on page 1 of a section, and chose Insert Page, it put the new page after page one and shifted all the rest down.
Thanks so much for taking the time to reply. I think I see my problem. I haven't created any sections, just pages. I guess you really have to use their format of pages within sections and sections within chapters.
I have started a new textbook with iBooks Author for a class I will be teaching. Any ideas on how to print the book out for students who don't have an ipad?
Printing is definitely not what Apple had in mind when making iBooks Author -- it is for interactive iPad books. But they did include a File, Print menu command in the usual place. Is that what you mean?
You can also save it out as a PDF and then students can read it on a variety of computers and devices as well as the iPad.
Hi Gary,
I just bought an IMac and iPad 2 and I am in the process of writing a textbook in iBooks Author. I am learning hands on because I've been on a PC for the last 15 years. Your videos are extremely helpful. Thanks!
I am having some difficulty when I edit my text in for the textbook to be read in the horizontal view. It seems to mess up the text when the iPad is turned to the vertical view.
This doesn't happen in the sample textbook by Prof. Wilson. Is there something I'm doing wrong. I am just learning all the word processing techniques for a Mac since I was strictly a Word guy for so long.
Thanks,
Tom C.
Just a matter of playing around with it and learning how to use all of the features. I'm not writing a textbook with it, like you, so you are way ahead of me -- most people probably at this early stage.
how do i change a video format to m4v format so i can use it in iBA? please advise
Many ways. Open it in QuickTime Player and export. Or use MPEG Streamclip, Miro, FFMPEGx, or one of many other free solutions. It doesn't need to be "m4v" -- it can be mp4 (if the file contains the right type of video).