
You can use the Shortcuts app on your iPhone or iPad to create a quick method to shrink an image before sharing it. With this more advanced Shortcut, you can choose a size in pixels or percent, and select the image format and quality.
▶ You can also watch this video at YouTube.
▶
▶ Watch more videos about related subjects: iPhone (358 videos), Shortcuts (80 videos).
▶
▶ Watch more videos about related subjects: iPhone (358 videos), Shortcuts (80 videos).
Video Transcript
Hi, this is Gary with MacMost.com. Today let's create the ultimate image resizing exporting shortcut for your iPhone.
MacMost is brought to you thanks to a great group of more than 700 supporters. Go to MacMost.com/patreon. There you can read more about the Patreon Campaign. Join us and get exclusive content and course discounts.
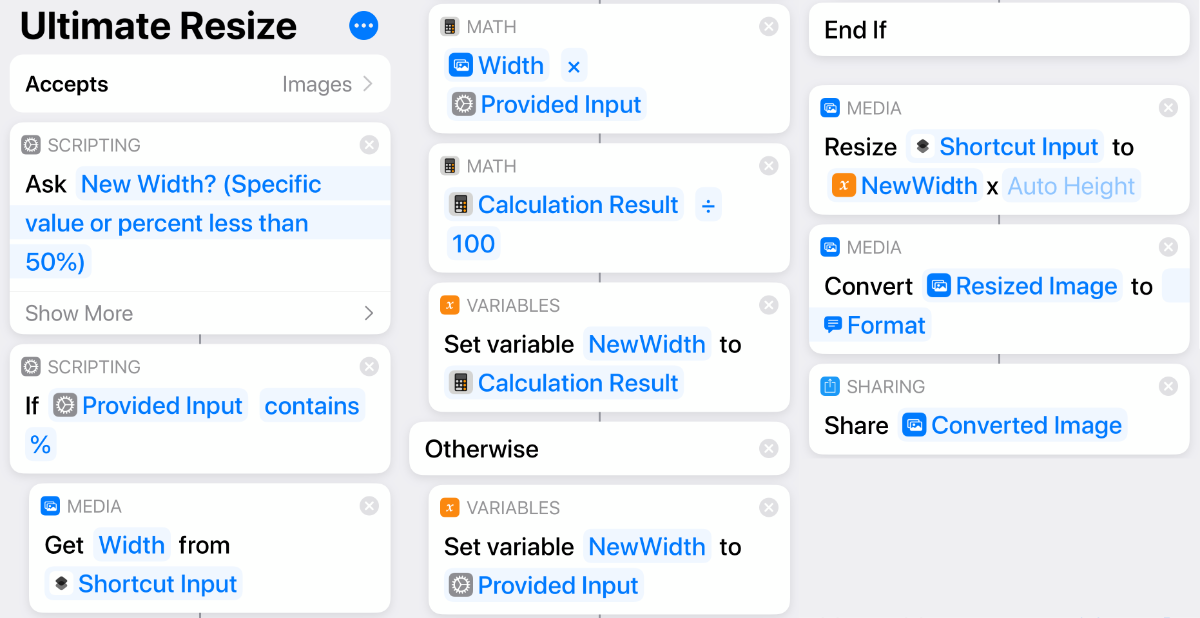
So awhile back I showed you how to create a really simple shortcut on your iPhone to resize a photo. This lets you easily create a smaller version of an image to upload to websites, share on social media, or send to friends. The shortcut was really basic. It just exported everything at just one width. What if we improved on that and created a shortcut that not only asked you for the width but allows you to provide a percentage or a specific fixed width and also allows you to choose the type of file format and the compression amount for JPEG's. It turns out it is pretty easy to do this.
So let's go into the Shortcuts app here and I'm going to create a New Shortcut. I'm going to go to the three dots there at the top right and give it a name. So I'll call it Ultimate Resize. Make sure it's shown in the Share Sheet for just Images. So deselect All and go to Just Images. So anytime you go to share an image you'll be able to use this. We'll tap on the icon here and choose a color and a GIF. Hit Done and then Done. Now we're ready to do the scripting here.
You could see because we said we only wanted this to appear when it's involving an image it says it Accepts images. We're all set there. Now the first thing we're going to add is ask a question. What size do we want the image to be exported as. So we'll do a Search here at the top for Ask and select Ask for Input. Now we want to be very specific in the question here. So the question is What's the new width? We want to be able to say you can provide a specific value or a percent less than 50%. Why less than 50%? It turns out there's a bug here in Shortcuts and if you try to resize an image to 50% or greater it doesn't seem to work. So you need to be like resizing to less than half. So like 40% size, 25% size. Most of the time that's what we want anyway. We don't want to just shrink the file a little bit. We want to shrink it a decent amount for resizing it.
Now under Show More we could say we want Input Type number. We don't want to do that because we want to allow the percent symbol there. So you could enter values in like 40% or you could enter numbers in like 640. Let's set a Default Answer here with a percent. So 25% or you could include whatever value you think you're going to be using all the time. I like to doing it as a percentage there. That way the percent sign symbol is already there. I could just change 25 to 10 or 15. If I want to actually have a specific number like 600 I can just delete the percent very easily.
So now we want to add another action here. We're going to go into Scripting and here we're going to use If. We're going to check to see whether or not the input contains that percent symbol. So you can see since it occurs right after we asked for something it already has filled in there If, provided input, and then we give a condition. The condition is going to be Contains and the value here is going to be the percent symbol. Then you could see there's Otherwise and End If. Now if it contains a percent symbol we want to calculate the actual width.
So to do that first let's get the width of the image that we selected. So we'll go in here and we'll go back up and we'll go to Media. In Media we'll go to Get Details of Images and we'll say get what detail. Well the Width. From what. Well, we'll select that and we'll say Magic Variable and we'll go all the way to the top here and select Shortcut Input. So get the width from the Shortcut Input. Move that after the IF statement there before Otherwise. Now we want to add the calculation based on that so we'll go back up to Scripting and we'll choose Calculate. Move that under here and we'll say calculate the Width and instead of plus we'll do times and then for the Number we'll go back to Provided Input which will refer back to what was entered in the Ask.
Now if we entered a number like 25 we don't want to multiply by 25. We want to multiple by point .25. So we want to do a further calculation so we're actually using percentages here. So we'll add Calculate again, move that here, and say do the Calculation Result. We can actually just divide that by 100 to get the percentage. So that's where we are so far. Now we want to store that in a variable. Go into Scripting and go down to the bottom where there's Variables. Set variable and we'll give it a name of New Width. Move that here so it will take the calculation result, that last part there divided by 100, and store it in New Width.
Now if you entered in a specific number and not a percentage we'll also store that in New Width. So let's use that same Set Variable. We'll put this under Otherwise. This is if a percentage wasn't entered in and we'll set the same exact variable to whatever the original provided input was. So in other words if you entered in 25% it's going to do a calculation. Take the width, multiply by 25, divide by 100 and you get the New Width 25% of the original. Otherwise if you didn't enter a percent symbol in it's going to take that number, whatever it was 640, 1200, and just put that into the New Width variable.
So now let's do the resize. I'm going to Add something here. I'm going to go backup to Media and under here, under Image Editing there's a Resize image. So we can resize. What do we want to resize? Well we will tap that there and we'll clear it and go back and say Magic Variable. Go all the way to the top and select Shortcut Input. Resize the shortcut input to what? 640 by auto height. No. We don't want 640 so we'll delete that. Instead we'll tap on Variables and select that New Width variable that we created times Auto Height. Yes, that's what we want. We want the new width times whatever the height would automatically be calculated using that new width.
So now we've resized it. The next thing we want to do is convert this. So here in Media we have Convert Image. Now automatically it is going to say Convert the Resized Image, so what was from the previous action, to a JPEG. Then it's going to have Show More here. Now we want to provide lots of options. So I'm going to tap on JPEG. You could see I could make it a PNG or GIF or whatever I want. But I could also select Ask Each Time. That means it will come up as a prompt. Something you could change when you export.
In addition to that that will also then ask for other things like the quality type if say it's a JPEG that's selected. Now what do we want to do after this. We could do something like say this is a file and share it to a certain app or whatever. But what I want to do is actually go and search for Share and there is the Share action. This sends it back to Sharing. So you're going to share this. You're going to specify what the new size is, what the format is, and quality and then it will go back to Sharing. Now you get to pick an option. So you could do almost anything you want with it. So that's the completed script. Let's hit Done.
Here I am in Photos. Let's Share this. So I'm going to hit the Share button at the bottom left. I'm going to go down here and look for my Ultimate Resize. Select that. Now I get to choose a new width. Let's keep it at 25% so it will do that calculation. It's also going to prompt me for all the information here in the conversion. So I can actually tap on JPEG there and choose what I want to use. I'll stick with JPEG. You could also choose the Quality and I can choose whether or not to Preserve Metadata. In other words the GPS location, what type of camera it was taken on, that kind of thing. Whether that's included in the new version. Then I hit Done.
Now when I do that it returns me to the Share sheet because the last thing was to share it. So now I can pick something else. So I could do almost anything here. I could send it into another shortcut if I want. But more likely I'm going to do something like Save Image. That will save it back to my Photo Library. Save to Files. That will save it out to a file in iCloud Drive or any other file system you have like DropBox or a local file. You could use any of these other things. Printing, Sending it to other apps. Anything that was available originally you can now send this modified version of the image to. We could just Save it to Files and I'll save it to my iCloud Drive there and I'll have that image now as a file.
So I'll have the complete script for this posted as an image at MacMost.com. I prefer to post shortcuts like that so you can actually build it yourself instead of importing it in. That way you learn the skills to modify it or create your own.
Here is the completed Shortcut:


Thanks for doing this tutorial. I had a mistake and found it using the above for verifying it. Is works well. Making shortcuts can be a little frustrating at times. Ralph
My Shortcuts app is different than what you show,
Is there an up-dated version ?
(I'm using the version from the Apple app store),'
When I add the 3rd script (Media), then Width, it's not followed by a "From" query, ?
area49: This video is brand new, so it is using the most recent version. Which version of iOS do you have? Play around with it and you'll figure it out, I'm certain.
I'm too simple and slow from Finland to make this shortcut myself. Can i have this shortcut ready and simple to put in my iphone (file).
Thank You
AP: I don't have a packaged-up version of it, so it is probably easiest for you to build it yourself. Just use the image above as a quick guide. Should only take a few minutes.
Gary: I have everything exactly as you have and I am not able to save th changes to a location (i.e. Shared album) or any other Action source.
Scott: Sorry, not sure what could be different. Is your iOS up-to-date? Play around with it and experiment.
Don’t do this after your 2nd covid shot. I’m an idiot. Want this SObadly, but can’t figure it out. Jen
Gary, pretty please can you sell it tome? I spent 2 hours on it. I’m new at this. I’m 61. My brain hurts. Have mercy! Offer it for sale!
Jennie: Just build it as you see in the image above.