
If you want to share a photo from your Photos Library or a file on your iPhone or iPad, you can use this Shortcut to resize it and convert it first. A very simple Shortcut can be used to do it for one photo, and a slightly more complex one can do it for multiple photos.
▶ You can also watch this video at YouTube.
▶
▶ Watch more videos about related subjects: iPad (180 videos), iPhone (357 videos), Shortcuts (80 videos).
▶
▶ Watch more videos about related subjects: iPad (180 videos), iPhone (357 videos), Shortcuts (80 videos).
Video Transcript
Hi, this is Gary with MacMost.com. Let me show you how to create a shortcut on your iPhone to resize photos.
MacMost is brought to you thanks to a great group of more than 1000 supporters. Go to MacMost.com/patreon. There you can read more about the Patreon Campaign. Join us and get exclusive content and course discounts.
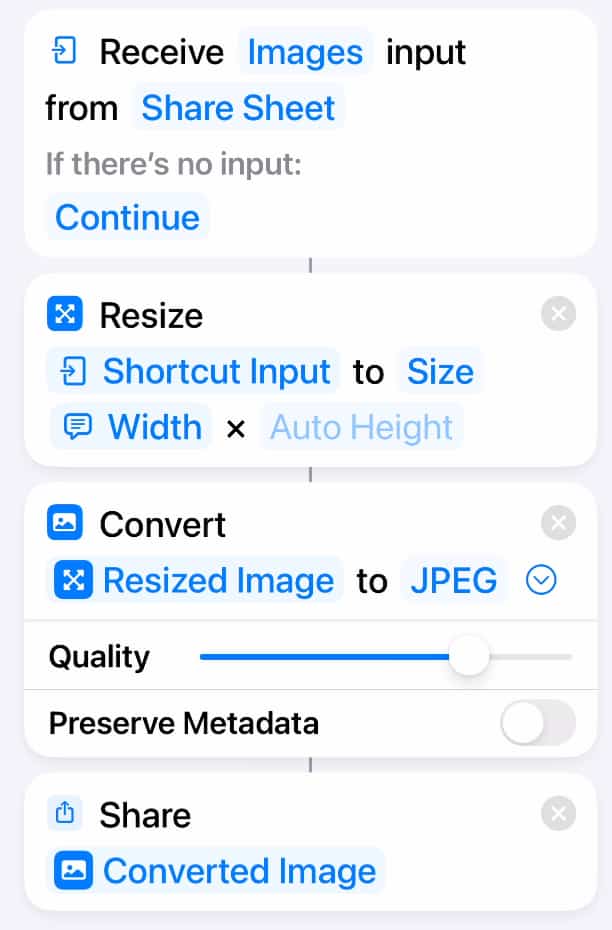
Now here's a topic I've talked about before but this time let's do it in iOS 16. Suppose you want to export some photos from the Photos App and you want to do it at a certain size and format and then you want those to go right to a Mail message or Save as files or Share in some other way. Let's go to the Shortcuts App and then we're going to create a new shortcut here. We're going to name it Resize Photos. Now let's add an action here and search for the action Resize. We'll just go right for the main thing we want to do. We find Resize Image and we'll add that. We could see it's going to take the first parameter, image. We'll tap on that and we'll say we want the Shortcut Input. Then we'll tap on Receive Any and we'll change Any to Just Images. Now we're going to change From, instead of Nowhere we're going to say Show In Share Sheet. So we can share a photo and we'll go right into the shortcut.
Now Resize is going to take that Shortcut Input and set it to a size of 640 wide by an automatic height that keeps the aspect ratio the same knowing that it is 640 wide. We can tap on 640 here and we can change that to Ask Each Time. So that will actually prompt us for the width so we can type whatever we want. 100 pixels, 240 pixels, whatever we need for that situation. Now that we've got the right size let's add another action. Let's search for Convert. We'll find Convert Image. So let's add that next and it will automatically pickup the output from the last action, the resized image, and convert it to JPEG. We can tap here and select another format if we want or have it ask each time if we really want. We can also tap here and change the quality and whether or not we want to preserve metadata for this photo. So if you don't want location information to come with the new image you can turn this off.
So now that we've taken this image, resized it, converted it to JPEG we want to share it again. So even though we started this whole thing by sharing we want to go back to Sharing. So I'm going to tap here and search for Share and just use the Share action. That's going to pickup the output from Convert. Using the Share Action allows us to do a variety of different things with the results of this Shortcut. For instance we can send it in an email, a text message. We can Save it to a file. We can send it right back to the Photos App. All the things you would normally find in the Share Sheet.
So that's it. This is a really simple shortcut here. I'm going to tap Done and we can see it right there. If we want to go back in and then tap up here we can set the icon to something more appropriate. I use the little camera icon there. Then I'll set it to a color that is easier to spot. Done. So now we've got that in Shortcuts. Let's go over to the Photos App.
So in the Photos App I'm going to go into a photo, like this, and I'm going to share it with the Share button at the bottom left. Then I'm going to look for the Resize Photos shortcut I just created. You could see it is going to ask us for the width, just like we wanted. So we'll do something small here. Say 100 pixels. Then it is going to finish the conversion to JPEG and now we're back at the Share Sheet. So now we can do what we want with it. Do we want to AirDrop it? Send it by a message? Send it by email? Save it back to the Photos App or Save it to Files. As a quick way to see what we've done let's tap Mail here. We'll start a new message and you can see that image there. It's rather small because it is only 100 pixels wide.
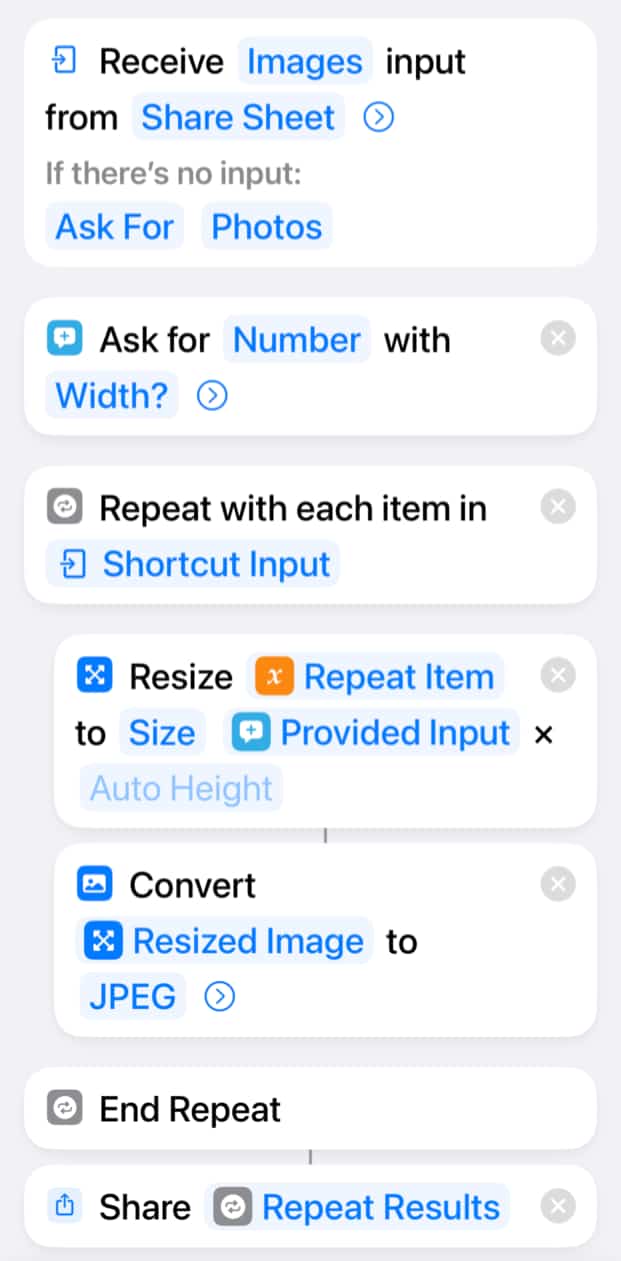
Now one of the problems with this Shortcut is it will only work for one image at a time. We can't feed it multiple images. But if we make the shortcut a little more complex we can add that functionality. So let's go back into Edit it in here and let's look for Repeat. We'll select Repeat with each. Now we want to move the Share Action after the Repeat. We want to move the Convert and Resize into the Repeat. Like this. Then we need to adjust everything. So we want to Repeat with each item in and we want to set that to the shortcut Input. So Repeat through all of the images that were sent in. Then Resize, instead of going to look at Shortcut Input, is actually going to look at the Repeat item. So every item as it goes through the loop. Then Convert here is going to take that Resized Image and now the end Repeat comes. So every time it goes through this it is going to create a new Resized Converted Image and add it to a list that will leave the Repeat Loop and then go to the next thing which is Share. So we want to switch from Converted Image here to instead the Repeat results.
Now if we run this now it's going to ask us for the width for every image we pass in. So we select 3 images and it will ask us three times for the width. Which might be good if you want to have a different width for each image. But if you want to have the same width then the way to do that is to ask before we go into the Repeat Loop. So I'm going to search for Input and then look for Ask for Input. Now I want to move that up to the top just before the Repeat Loop starts. So it is going to ask for what. Not text. We want a number and then with the prompt. So we'll put something like Width. Then we can tap on this little button here and set a default number. Let's do that. Set 240 as the default. We don't need to allow decimals and we don't want to have negative numbers for this. So Done. So it is going to ask for the width.
Here where we have the size we have this Ask Each Time thing for width. We want to clear that out and instead we go in here and we say Select Variable and we're going to use the provided input that comes out of the Ask. Now let's go back to the top here and make this even more versatile. See at the top here it says Receive Images Input from Share Sheet. If there is no input, continue. Let's change that to Ask For and you see it automatically picks photos. So this way if we run Shortcut by itself it will actually prompt for photos. So another way to use the same Shortcut. Note there is an option here to allow you to select multiple ones when it is asking for photos. So now if we look through what it does it's going to ask for a number here at the beginning. It's going to give the default of 240 but let you type whatever you want. Then it is going to go through a Repeat Loop going through each item that was passed into the shortcut. It's going to Resize each of those items to the size provided by that Input up there. Then it is going to convert each one of those to a JPEG image, remember we set it up for this quality with no metadata. Every time it goes through that loop it is going to add another image to the list. That's going to go out to the Share Action with all of the Repeat results. So if there are 3 images there will be 3 images that we would be sharing.
Let's give it a try. In the Photos App here I'm going to tap Select at the top and I'm going to select 3 different images. Then I'm going to Share and look for Resize Photos. It's going to prompt me here for the width. I'm just going to use the default, 240. Done. Then it is going to do that for all 3 images and you could see here at the top it says three images. So what do I want to do with them? So let's say we want to send them in an email message. Now we can see the email message and it's got all 3 of those images attached. They are all 240 pixels wide. Let's do the same thing but instead of sending these to Mail, we're just going to save them as files. So in this case let's set this to just 100 pixels wide. So really small. Then we're going to go to Save to Files. Then select a destination. Let's say the Desktop. Save. Now if we go into the Files App and we look at our Desktop Folder we'll find those 3 images there. If I select one you can see how it is pretty small. Just 100 pixels wide.
So let's try running this another way. I'm just going to launch this Shortcut without being in the Photos App. When I do that it is going to bring up the Photos Picker. I can select a couple images like this. Add. It will run this. Then I can choose how to Share it. Let's share it to an email, for instance. You could see how I can do it that way. I can also be in the Files App. Select an image there. Then Share and because it is an image I'm going to get the same Resize Photos shortcut. So I can Resize this and then share it how I like.
So there you go. There's a very simple shortcut that's also very versatile. You can use it for a single photo, multiple photos, from the Photos App, from a File, and you can use this to share photos at any size in any number of ways that you want. I recommend that you create the shortcut on your own so you can learn how shortcuts work and I'll include an image that allows you to see exactly the parts that you need to add. I'll also include a link for you to easily add this shortcut to your Shortcuts App on your iPhone. Check out the post at MacMost.com for those. Hope you found this useful. Thanks for watching.
This is the simple one-file shortcut:
This is the shortcut that works with multiple files:
Download it here:
Resize Photo Shortcut


Thanks for this shortcut. I'm wondering if I'm missing something on the Mac side. I have the shortcut, which works fine under ios, showing up on my mac as well. However, when I click on an image in the finder, or in Photos, I don't have the Save to Files option for saving. Is that a feature of IOS only?
Dan: macOS is very different. This Shortcut is for iOS. macOS doesn't have a simple "Files" app as handling files is much more central to using a Mac. You'd need a different Shortcut. But of course you have the Preview app on the Mac so you can just use that to resize an image. You don't have that on the iPhone thus the need for a Shortcut like this.
Got it. Thanks. Always looking for that universal shortcut. :-)
Excellent shortcut. I'm experiencing one issue on the iPad. When I run the shortcut by tapping on the shortcut I am only allowed to select one photo. As soon as I select one photo the shortcut runs to completion. However, if I first select the photos from the photo app then choose "Resize Photos" it resizes all selected photos. But unfortunately this is not the case when I run the shortcut first. Am I doing something wrong?
Mark: No, I think that's all you can do.
I followed the steps to create the shortcut then when I get to the stage to select an image I click the share button bottom left but there isn’t a resize image tab there anywhere?
Matt: Are you using the Share button with an image selected like I show starting at 7:13?
Unfortunately this shortcut always just resizes 3 pictures instead of all. Any idea what i did wrong?
Fabian: So if you select 4 it just stops after 3? I wonder if it is timing out on you, like quitting after it isn't finished after x seconds. Then the number would depend on the speed of your Mac and the size of the images.
Thanks for the quick reply.
I took 12 photos i wanted to resize.
It will always just resize the same 3 photos no matter how many or which pictures i select.
Interesting is that these are the 3 pictures i drew numbers in it with the marking tool.
Otherwise all the pictures are exatcly the same.
Even if i use the resize shortcut for 1 photo it only works on one of these 3 pictures.
I tested around a little bit and it seems this shortcut has a problem with RAW photos.
All oder photos i took work, Just not the RAW ones.
With an exception being the 3 RAW photos i used the marker tool on.
Any idea why?
I found a work around that works.
I convert them to JPG before i resize them and everything works.
Fabian: Yes, converting to jpg would do the trick. Drawing in the photos would have forced that so this explains it.
I thought I did everything right, but I always get multiple copies. If I select 3, I get 9 copies. If I select 5, I get 20. If I select 4, I got 12; If 8, I got 64
Hi Gary, Nice stuff above...So i have my photos saving to my icloud....i tried to mess with your script above to ALSO Rename the photos when they are in the folder where i put them...Thoughts? I want to use something like..IMG - 6000 - date taken... so for 3 Photos IMT - 6000, IMG - 6001, IMG - 6002 and at the end each photo the Date taken....i got it to partially work...but i think im doing something wrong. Thank you sir! Semper Fi
Justin: Hard to guess where it could be going wrong. Is there a difference between the photos that work and don't? Maybe some were cached and others only in iCloud? Just keep working at it.
Good Morning Gary. I think the Rename is in the wrong spot Above pictures u have im using the second one...In that, after repeat and Before share results i have the Rename. So it goes thru, and resizes them...but only renames the Last image to the perimeters ive set.
Dare i ask that you try it on your end...and post a Screen shot like you did above with it Renaming the Saved results, if you get it working on your end sir?
Justin; Sorry, not following you as there is no "rename" in the Shortcut.
Edit Shortcut, and in the search at the bottom...search for Rename File
Justin: Not getting you. Neither the screenshots above nor the Shortcut you can download above includes rename.
Gary...I understand...i am Trying to modify Your Second Pic above (Multiple photos) to Rename the files also when the shortcut is run...Im Trying to Add the "Rename file" Function to the Multiple selection of photos.
Sorry if i wasnt clear sir.
Justin: Ah, well to do that things will get quite a bit more complex. No easy way to guide you. Perhaps just use this to change the size of the photos and then the Finder's batch rename tool to rename them afterward.